It is annoying when you see the iPhone says No SIM. Problems arise: Whether it be a physical SIM card or an eSIM, coming unplugged can cause call failures and text errors as well as make your cellular data connection unavailable. In this detailed guide, we will cover some working solutions for SIM or eSIM Failure that could get your iPhone back to functionality.
Understanding SIM and eSIM Issues
SIM (Subscriber Identity Module) and eSIM (Embedded SIM) are crucial for cellular connectivity. When your iPhone displays a “No SIM” message, it typically indicates:
-
- A problem with the physical SIM card.
-
- Incorrect eSIM activation or settings.
-
- Software glitches or bugs.
-
- Hardware issues or damage.
Common Causes of SIM or eSIM Failures
Understanding the root cause can simplify troubleshooting:
-
- Improper SIM card insertion.
-
- Network outages or carrier issues.
-
- Outdated iOS software.
-
- Damaged SIM card or tray.
-
- Settings misconfiguration.
Step-by-Step Fixes for SIM or eSIM Failure
To fix the “No SIM” warning, attempt the following troubleshooting procedures:
1. Check SIM Card Insertion
Ensure the SIM card is correctly inserted into the SIM tray:
-
- Remove the SIM tray with a SIM eject tool.
-
- Inspect the SIM card for damages or dirt.
-
- Reinsert the SIM card properly and securely.
2. Restart Your iPhone
A simple restart can resolve many minor glitches:
-
- Up until the slider appears, press and hold both the side and either volume button.
-
- Slide to power off.
-
- After your iPhone is off, hold the side button again until the Apple logo appears.
3. Toggle Airplane Mode
Enable and then disable Airplane Mode to refresh network settings:
-
- Swipe down to access Control Center.
-
- Tap the Airplane Mode icon to enable it.
-
- To disable it, wait a few seconds, then tap it once more.
4. Update iOS Software
Run the latest iOS update to fix potential bugs:
-
- Go to Settings > General > Software Update.
-
- Install any updates that are available by downloading them.
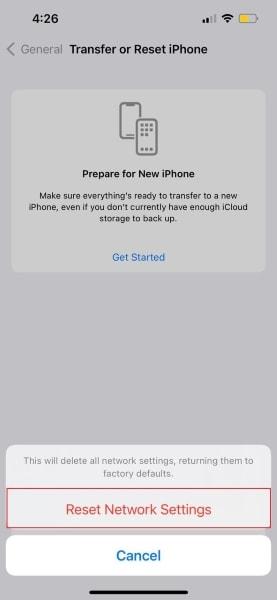
5. Reset Network Settings
This action will restore your network settings to default:
-
- Navigate to Settings > General > Transfer or Reset iPhone.
-
- Select Reset > Reset Network Settings.
-
- Enter your passcode and confirm the reset.
6. Refresh eSIM Settings
If you’re using an eSIM, try refreshing the settings:
-
- Go to Settings > Cellular > Add Cellular Plan.
-
- Re-enter your eSIM information as necessary.
7. Contact Carrier Support
For support, get in touch with your mobile provider if issue continues. They might check if your line is active or if there are outages in your area.
Benefits of Resolving SIM or eSIM Issues
Addressing SIM or eSIM failures quickly can save you time and improve your overall smartphone experience. You can Edit Sent Messages on Instagram: Benefits include:
-
- Restored connectivity for calls and data.
-
- Minimized frustration and disruption.
-
- Ensured access to important notifications and updates.
Real-World Experiences: Case Studies
Here are a few real-world experiences of users who resolved their iPhone “No SIM” issues:
| User | Problem Encountered | Solution |
|---|---|---|
| James | SIM card not recognized | Reseated SIM card and updated iOS |
| Emily | No cellular data | Reset network settings |
| Michael | Error in eSIM activation | Contacted carrier for assistance |
Practical Tips for Future Prevention
To minimize future SIM or eSIM issues, consider these tips:
-
- Regularly update your iPhone to the latest iOS version.
-
- Handle SIM cards carefully to avoid physical damage.
-
- Keep your iPhone’s SIM tray clean and free from dust.
Conclusion of SIM or eSIM Failure
Experiencing the “No SIM” message on your iPhone is no easy thing to deal with, but by following these troubleshooting steps you can get it fixed for good. From simple things like a loose SIM card to regular software updates, understanding where the issues come from and what you can do about them will help keep your iPhone connected. For more in depth assistance you can always contact your carrier but as a reminder, be sure to keep firmware updates on your device up-to-date.
