In the current digital world, a reliable and fast domain name system (DNS) is of considerable significance. A change in Domain Name System (DNS) server may result in faster browsing, increased security and added privacy. This article aims to provide you with all the necessary information about how to change DNS server, its advantages, useful hints and detailed instructions for different devices.
What is a DNS Server?
In its working, a DNS server is like the phone directory of the internet. While typing a domain name into your address bar (e.g., www.example.com), the function of the DNS server is to translate this domain into numbers called IP which enables your browser locate that site on Internet. Different options for a DNS service are available including those offered by your ISP or popular public DNS servers.
Why you should change your DNS server?
What are the reasons why some users switch their DNS server? Below is given a number of compelling reasons for switching.
-
- Better Speed: Public DNS servers can have faster response times than ISP servers, which😧 means quicker page loads.
-
- Improved Security: Some providers of DNS boast that they offer phishing protection and block malware.
-
- Enhanced Parental Controls: A set of certain DNS services will give you options about filtering off indecent materials.
-
- Overcoming Restrictions: Altering your DNS might be helpful to get around regional restrictions.
Popular DNS Servers to Consider
| DNS Provider | Primary DNS | Secondary DNS | Key Features |
|---|---|---|---|
| Google Public DNS | 8.8.8.8 |
8.8.4.4 |
Fast, reliable, no tracking |
| Cloudflare | 1.1.1.1 |
1.0.0.1 |
Privacy-focused, fast |
| OpenDNS | 208.67.222.222 |
208.67.220.220 |
Security features, customizable |
| Quad9 | 9.9.9.9 |
149.112.112.112 |
Blocks malicious sites, privacy |
Step-by-Step Guide to Change DNS Server on Different Devices
1. Windows 10 and 11
- Open the Control Panel.
- Click on Network and Internet.
- Select Network and Sharing Center.
- Click on Change adapter settings.
- Choose Properties by right-clicking on the network connection that is currently active.
- Click Properties after selecting Internet Protocol Version 4 (TCP/IPv4)..
- Choose the option Use the following DNS server addresses and enter your preferred DNS servers.
- Click OK to save changes.
2. macOS
- Go to System Preferences.
- Select Network.
- Choose the active network connection.
- Click Advanced.
- Go to the DNS tab.
- Remove existing DNS servers and add new ones.
- Click OK and then Apply.
3. Android
- Open the Settings app.
- Select Network & Internet.
- Tap Wi-Fi and select your connected network.
- Scroll down and tap on Advanced.
- Change IP settings to Static.
- Enter your new DNS addresses and save.
4. iOS
- Open Settings.
- Tap on Wi-Fi.
- Tap on your connected network.
- After swiping down to DNS, select Configure DNS.
- Change from Automatic to Manual.
- Add your new DNS servers and save.
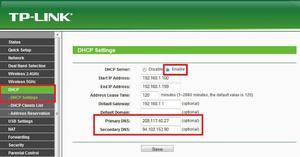
5. Router
- Open your web browser and enter your router’s IP address.
- Log in using your credentials.
- Navigate to the settings section for DNS.
- Enter your new DNS server addresses.
- Save settings and reboot the router if necessary.
Common Issues When Changing DNS Servers
While changing your DNS server is generally a straightforward process, some users may encounter problems. You can also know How to Check the iPhone Battery on a MacBook and iPad: Here are a few common issues and their solutions:
-
- Internet Connectivity Issues: If you lose your internet connection after changing your DNS, double-check the entered addresses for accuracy.
-
- Slow Performance: If the new DNS is slower, it might be worth trying a different provider.
-
- Caches and Residual Data: Clear your browser cache and DNS cache on your operating system to avoid conflicts.
First-Hand Experience: My Journey to Faster Internet
After I changed my DNS server to Cloud flare, the websites that I used to open would load much faster. For instance, switching to Cloudflare gave me a chance to explore more about internet security as it also helps block phishing attempts and this has helped me feel safer while browsing. As a result, my entire online life is now more fun thanks to shorter page loading wait times.
Conclusion about Change DNS Server
Your internet experience can be significantly affected by changing DNS server which improves on speed, security and accessibility. By following the simple steps provided in this manual, you can even boost your surfing efficiency as well as get a safer online environment. There is no need to hesitate. You can try some of the most popular DNS providers like google public DNS, cloudflare, opendns and quad9 which suit your needs. Also remember to check your DSN settings occasionally for a good performance.
Feel free to leave a comment below if you have any questions or want to tell us about your experiences after changing DNS servers.